The Memory Behind This Treat
The first time I whipped up these Cheddar & Herb Dog Biscuits, it was a chilly Saturday morning. Max, my ever-enthusiastic Labrador, was bouncing around the kitchen, his nose twitching as the savory aroma filled the air. I had recently read about the benefits of using fresh herbs in dog treats, so I decided to experiment with some parsley and rosemary. As I finely shredded the cheddar and minced the herbs, Max kept nudging my leg, clearly eager to sample my work!
These biscuits were inspired by one of our favorite hiking trips. Max and I love exploring the trails, and I always pack a bag of homemade treats for rewarding good behavior. One day, after a particularly successful training session on the trail, I realized how much Max enjoyed the combination of cheese and herbs from a snack I had. That moment sparked the idea for these homemade dog treats.
Baking these biscuits became a little ritual for us. The kitchen would be filled with Max’s excited energy, and I’d have the satisfaction of knowing I was giving him something healthy and delicious. The crunch of the biscuits with their cheesy, herb-infused flavor quickly became one of Max’s favorites, perfect for our adventures or a cozy evening at home. If you’re looking to create new memories with your furry friend, these treats might just become a beloved tradition for you both too.
How To Make It (Mix & Ingredients)
Making these Cheddar & Herb Dog Biscuits is a breeze, and the results are sure to have tails wagging! Start by gathering all your ingredients because once you get rolling, you won’t want to pause. Finely shred the cheddar cheese to ensure it blends seamlessly into the dough—no clumps allowed! If you’ve opted for fresh herbs, make sure they’re washed, dried, and minced finely. This preparation ensures the flavors are evenly distributed, making each bite of these homemade dog treats utterly irresistible.
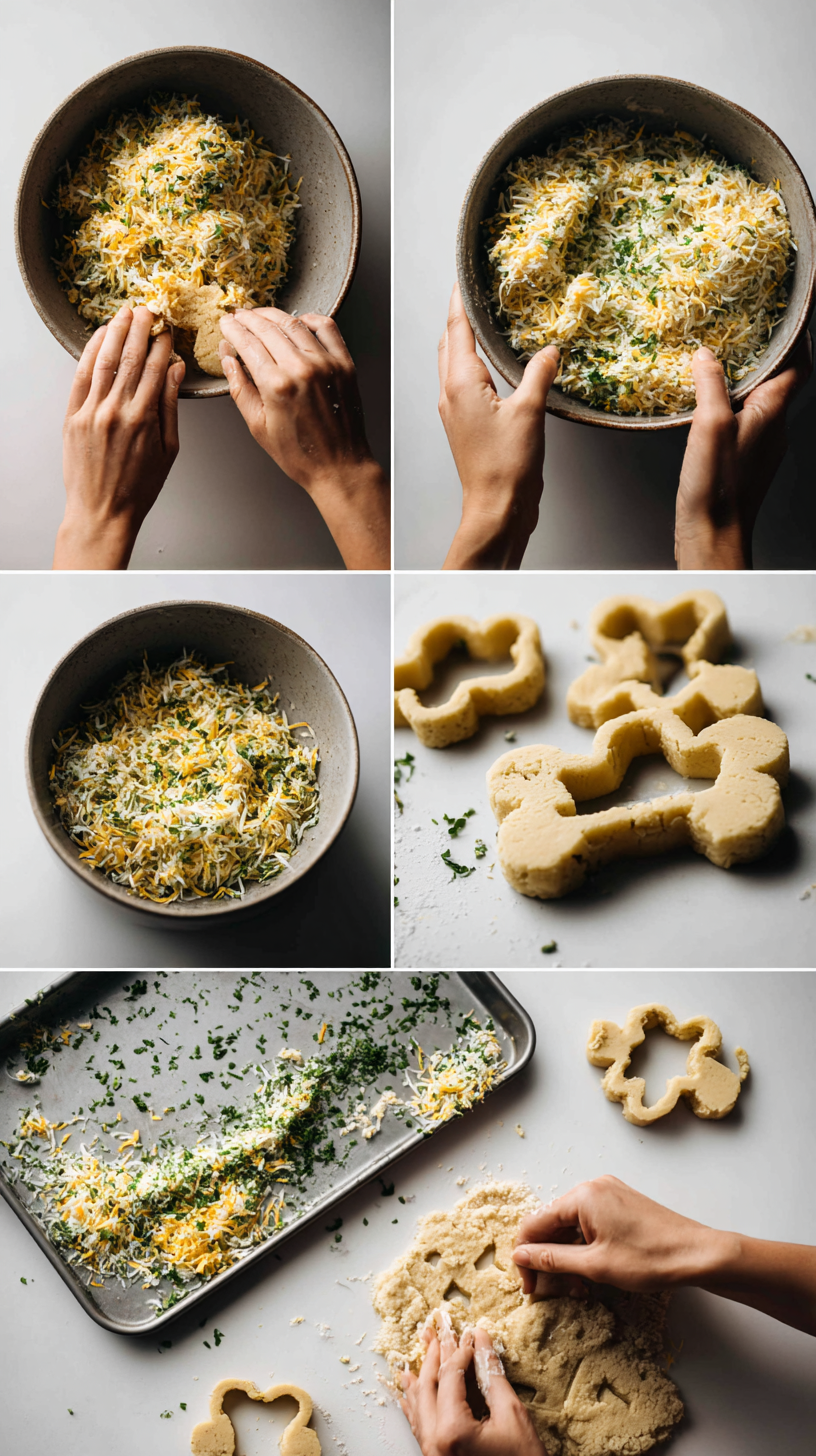
In a large mixing bowl, combine your dry ingredients: whole wheat flour, rolled oats, shredded cheddar, parsley, rosemary, and baking powder. Stir well to make sure the cheese and herbs are evenly mixed throughout. In a separate bowl, whisk together the egg and melted coconut oil until smooth. Add this wet mixture to the dry ingredients, followed by the unsalted chicken broth or water. Stir until a cohesive dough forms. If the dough feels too crumbly, don’t panic! Add water 1 tablespoon at a time until it comes together. Conversely, if it feels sticky, a light dusting of flour will do the trick.
Once your dough is ready, you’re well on your way to seeing your pup’s delighted face. Remember, this process is as much about the love you’re baking into each biscuit as it is about the ingredients. Don’t fret if things get a bit messy—your dog will love these Cheddar & Herb Dog Biscuits all the same!
Make-Ahead & Storage
Making these Cheddar & Herb Dog Biscuits ahead of time is a breeze, and it ensures that you always have a tasty reward ready for your pup. Once you’ve baked these savory treats, allow them to cool completely on a wire rack. This helps prevent any trapped moisture from making them soggy, ensuring a delightfully crunchy texture your dog will adore.
For storage, place the Cheddar & Herb Dog Biscuits in an airtight container. They’ll stay fresh at room temperature for up to a week. If you’ve made a large batch or want to keep them for longer, freeze the biscuits in a resealable bag. Just make sure to let them thaw completely before serving to avoid any icy surprises for your furry friend.
When making the dough, you can also choose to freeze it before baking. Simply wrap the dough tightly in plastic wrap, then place it in a freezer bag. It will keep for up to 3 months. When you’re ready to bake, let the dough thaw in the refrigerator overnight. This is especially handy if you want fresh biscuits without the fuss of starting from scratch. Remember, always monitor how your dog reacts to new treats, especially when trying them for the first time. If your dog shows any signs of allergies or discomfort, consult with your vet.
Best Ingredients & Party Variations
When crafting these Cheddar & Herb Dog Biscuits, choosing the right ingredients makes all the difference. Opt for low-fat cheddar cheese to keep the treats tasty yet healthy. The cheese should be finely shredded to blend seamlessly into the dough, ensuring every bite is filled with cheesy goodness. Using whole wheat flour provides a hearty texture, but if your pup has a sensitive tummy, oat flour is a gentle alternative. Don’t skip the dog-safe herbs like parsley and rosemary; they add a delightful aroma and flavor that will have tails wagging.
For party variations, you can easily customize these biscuits to suit any doggy gathering. Add a sprinkle of dried carrots or pumpkin puree to the mix for a vibrant twist. These ingredients not only enhance flavor but also bring a splash of color—perfect for making your furry friend’s treat table stand out. If you’re feeling adventurous, try using mint leaves instead of parsley for a refreshing aroma that keeps canine breath fresh.
Remember, each dog is unique, so it’s great to experiment with safe substitutions and see what flavors your pup prefers. Perhaps your dog enjoys a bit of spinach for added nutrition or a hint of cinnamon for warmth. Whatever variation you choose, keep the ingredients simple and safe, and your pup will enjoy every crumb. For more ideas, check out our other biscuit recipes in our collection of homemade dog treats.
FAQ’s About Cheddar & Herb Dog Biscuits
Are cheddar and herbs safe for dogs in homemade biscuits?
Yes, in moderation! Low-fat cheddar cheese is generally safe for dogs that are not lactose-intolerant. Herbs like parsley and rosemary are dog-friendly and can offer mild health benefits. However, always avoid using herbs such as onion or garlic powder, as these are toxic to dogs.
Can lactose-sensitive dogs enjoy cheddar & herb dog biscuits?
If your dog is lactose-sensitive, consider using aged cheddar, which has lower lactose content, in very small amounts. Alternatively, you can skip the cheese and use nutritional yeast for a cheesy flavor without the dairy. Always monitor your dog for any signs of discomfort or intolerance.
What herbs are best to use in cheddar dog biscuits?
Safe herbs to use include parsley (stick to curly parsley), rosemary, basil, and oregano in small amounts. These herbs add flavor and can support your dog’s health. Avoid any herbs belonging to the onion family, such as onion chives, as they are harmful to dogs.
How long do Cheddar & Herb Dog Biscuits remain fresh?
The freshness depends on how you store them. At room temperature, store in an airtight container for up to 5–7 days. In the refrigerator, they can last 2–3 weeks, while in the freezer, they remain good for 2–3 months. For a longer-lasting treat, bake them a bit longer to achieve a crispier texture.
Conclusion
Making these Cheddar & Herb Dog Biscuits is more than just whipping up a treat; it’s about sharing love and creating joyful moments with your furry friend. Picture the delight in your pup’s eyes and the wagging tail as they savor each cheesy, herby bite. Baking these biscuits can be a delightful family activity, bringing everyone together in a moment of creative fun and canine happiness.
I encourage you to roll up your sleeves and give this recipe a try. Not only will your dog thank you with endless affection, but you’ll also enjoy the satisfaction of knowing exactly what’s in their treats. Plus, the aroma filling your kitchen is a treat for you too!
For more delicious recipes like this, follow us on social media! Let’s keep celebrating the bond we have with our dogs, one homemade treat at a time.

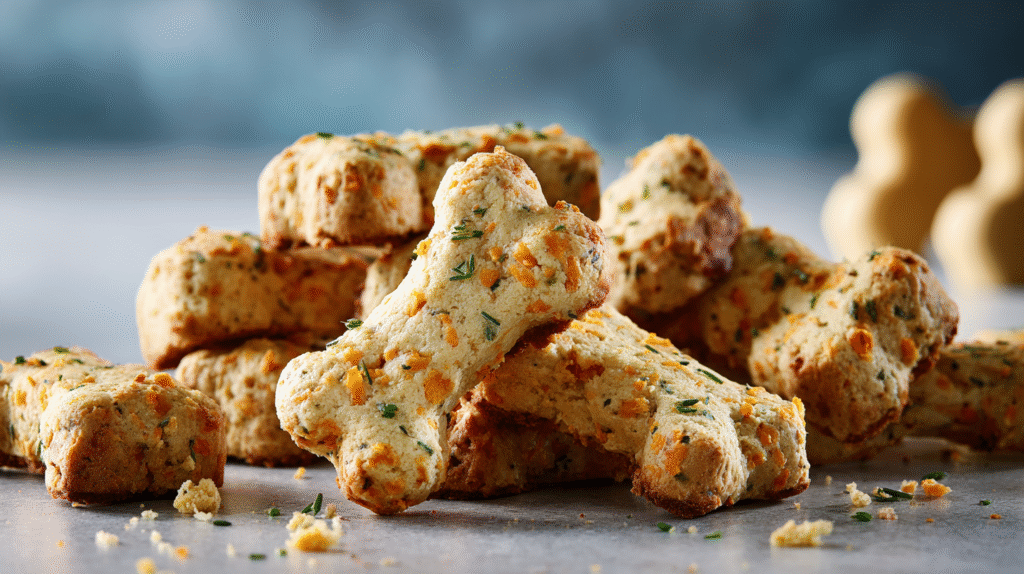
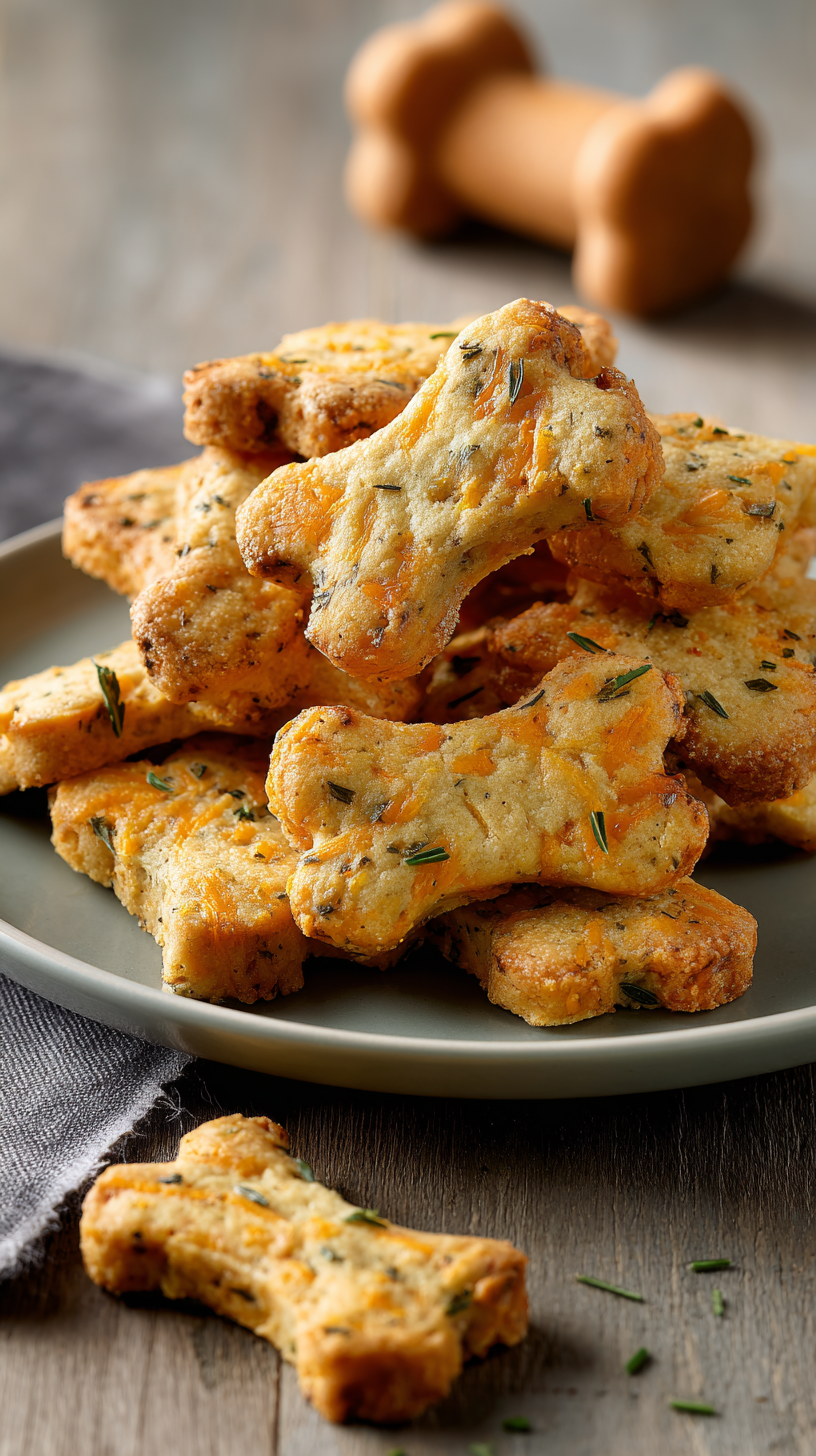
Cheddar & Herb Dog Biscuits: Easy, Tail-Wagging Treats
Ingredients
Method
- 1. Preheat oven to 350°F (175°C).
- 2. In a large bowl, combine flour, oats, cheddar, parsley, rosemary, and baking powder.
- 3. In another bowl, whisk egg and melted oil.
- 4. Add wet mixture to dry ingredients; mix well.
- 5. Stir in broth or water until dough forms. Add extra water if crumbly.
- 6. Roll out dough on a floured surface; cut into shapes.
- 7. Place on a baking sheet; bake for 25 minutes until golden.
- 8. Cool completely on a wire rack before serving.