The Memory Behind This Treat
The inspiration for these Cheesy Nutritional Yeast Cookies for dogs came from a sunny afternoon with Max, my ever-enthusiastic Labrador. We were on one of our favorite walks through the park, with Max stopping to sniff every interesting scent and meandering his way to every dog we passed. I remember thinking about how much Max loves cheese but how dairy doesn’t always agree with his sensitive tummy. That’s when the idea hit me—why not try nutritional yeast, with its cheesy flavor and health benefits?
Back home, I started experimenting in the kitchen, eager to create something both delicious and gentle on Max’s stomach. I could sense Max’s curiosity as he watched me blend the oat flour and nutritional yeast, his nose twitching in anticipation. The first batch was a hit—Max was wagging his tail with every crunchy bite. It was a relief to see him enjoy a lactose-free treat without any worries.
The smile on Max’s face as he devoured these cookies was all the motivation I needed to share this recipe. It’s become a staple in our home, perfect for those cozy evenings when we’re snuggled up, and I want to give him something special. These nutritional yeast cookies have not only become a favorite for Max but also a delightful way to ensure he’s munching on something healthy. If your pup has a soft spot for cheese but needs to avoid dairy, these treats might just become your new go-to!
How To Make It (Mix & Ingredients)
Creating these Cheesy Nutritional Yeast Cookies for Dogs is as easy as a walk in the park with your furry friend! Start by gathering your dry ingredients. In a mixing bowl, combine 1 ½ cups of oat flour, ½ cup of rolled oats, 2–3 tablespoons of nutritional yeast, ½ teaspoon of turmeric, and a touch of baking powder if you prefer a softer cookie. The vibrant yellow from the nutritional yeast and turmeric will let you know everything is perfectly mixed.
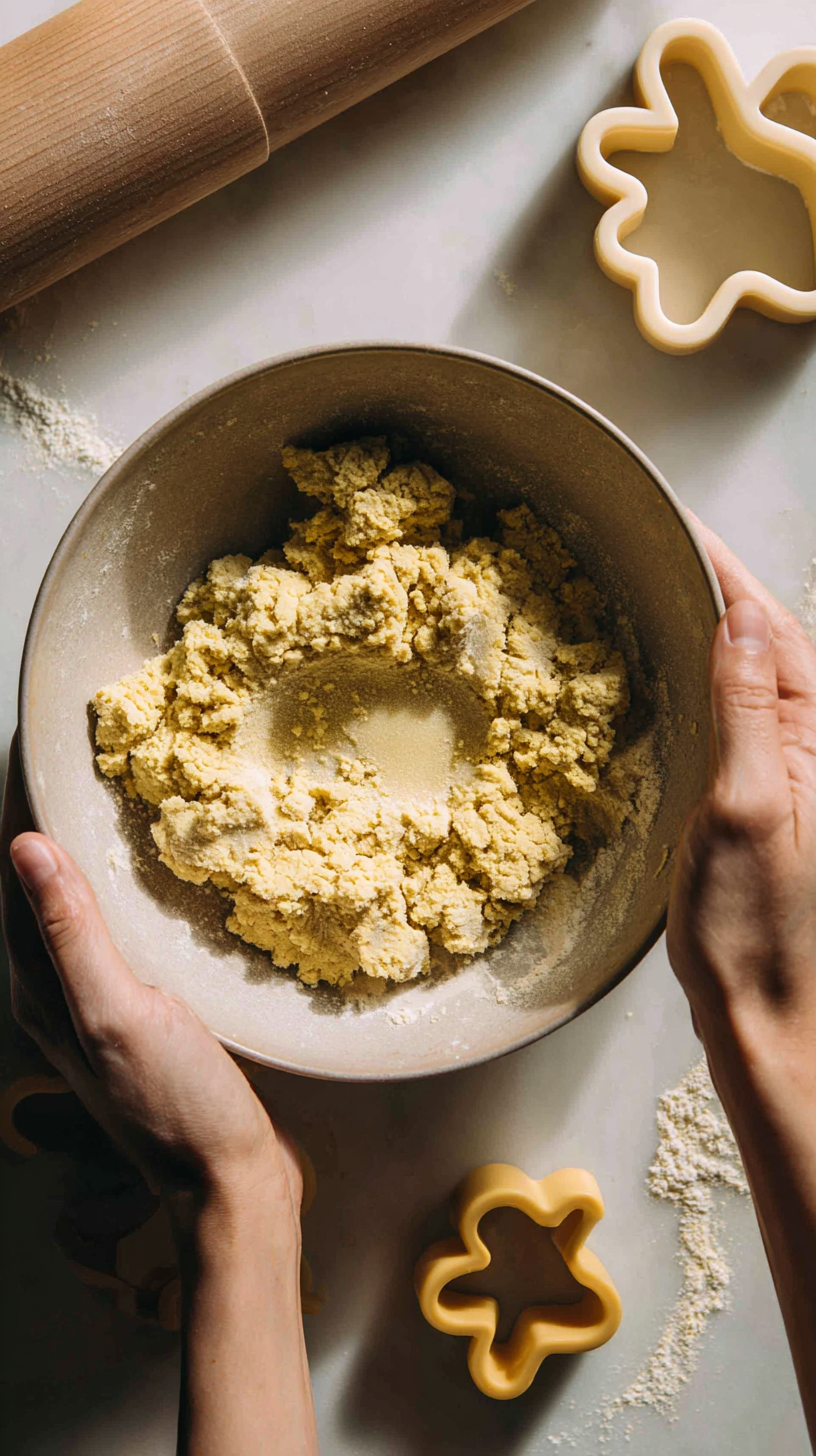
Next, let’s tackle the wet ingredients! In a small bowl, whisk together one large egg and 2 tablespoons of melted coconut oil until smooth. Pour this mixture into your dry ingredients, followed by ⅓ cup of unsalted chicken broth or water. Stir everything until a dough forms. If it seems a bit dry, gently add water a tablespoon at a time. If it feels too sticky, sprinkle in a smidge more oat flour. You’re aiming for a dough that’s soft, smooth, and easy to roll—much like a playful pup’s belly!
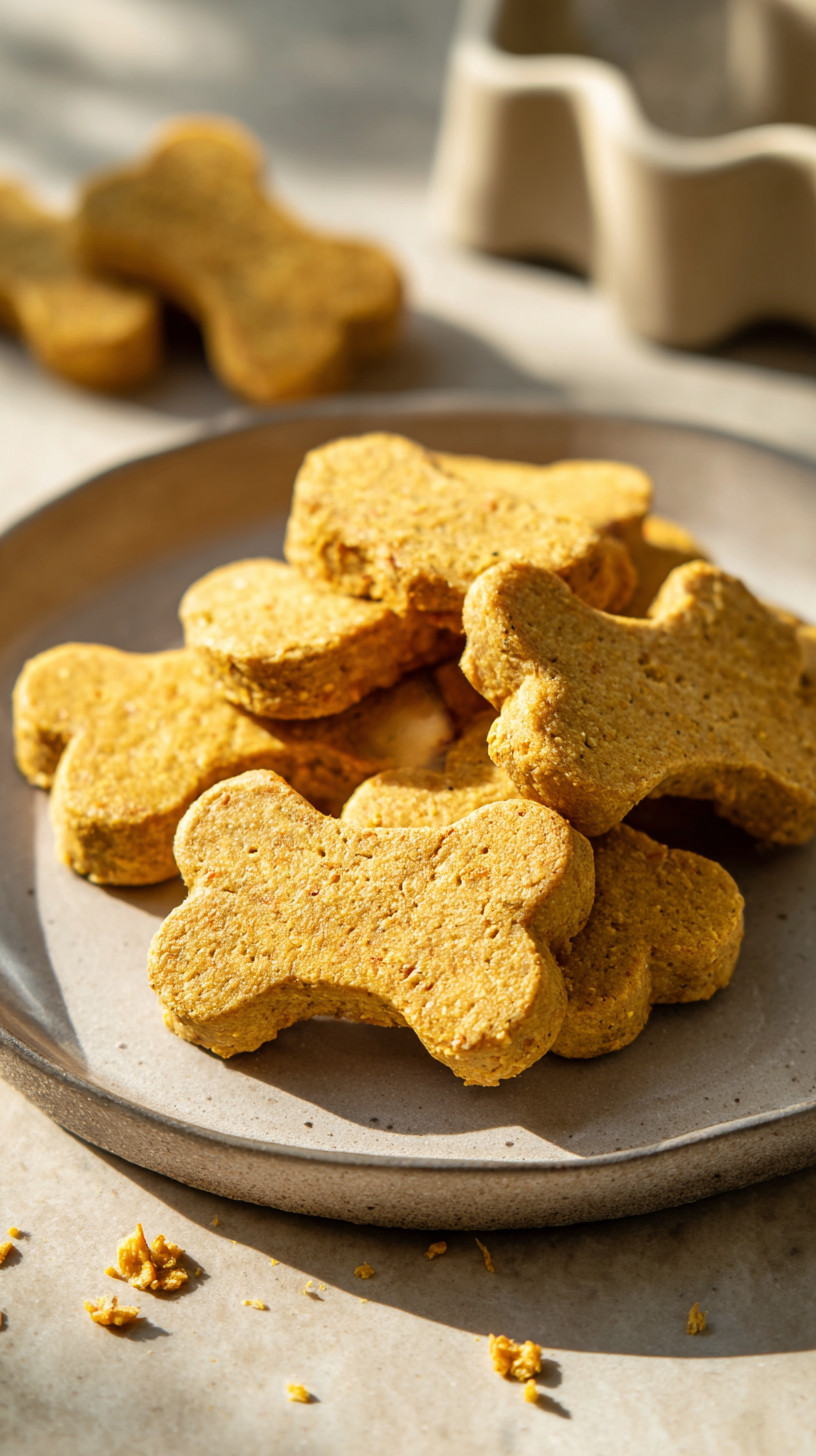
Now, you’re all set to roll out this dough and cut it into fun shapes—perhaps bone-shaped cookies for a playful touch. Max always sits by my side, tail wagging in anticipation, as I roll the dough. Remember, never use xylitol—it’s toxic to dogs! Once done, you’ll have a dough ready to bake into delightful treats that are sure to make any tail wag with joy.
Make-Ahead & Storage
When it comes to planning ahead with these Cheesy Nutritional Yeast Cookies for Dogs, you’re in for a treat that’s as easy to store as it is to make. Once baked and cooled, these cookies can be stored in an airtight container at room temperature for up to 1 week. This makes them perfect for busy dog parents who want to have a steady supply of goodies on hand. Just be sure to keep the container out of direct sunlight and in a cool area of your kitchen.
If you’re looking to extend the shelf life of these delightful snacks, consider freezing them. Place the cookies in a freezer-safe bag or container, separating layers with parchment paper to prevent sticking. Stored this way, they’ll keep their crunchy, cheesy goodness for up to 3 months. When you’re ready to treat your pup, simply thaw the desired number in the fridge or on the counter until they’re back to their delightful crunchiness.
Remember, always check the cookies for any signs of spoilage before serving. A quick sniff test should do the trick—if they smell off, it’s best to whip up a fresh batch. For more tips on homemade dog treat storage, check out our guide on keeping dog treats fresh and tasty.
Best Ingredients & Party Variations
When whipping up these Cheesy Nutritional Yeast Cookies for dogs, it’s all about picking the freshest and most dog-friendly ingredients. Nutritional yeast is not just a cheesy flavor hero; it’s a powerhouse of vitamins, especially B vitamins, that can boost your pup’s energy and coat health. Opt for oat flour over wheat to keep the cookies gentle on sensitive tummies. If you don’t have oat flour on hand, simply blend rolled oats into a fine powder.
Turmeric adds more than just color—it’s an anti-inflammatory that can help older dogs with joint discomfort. Just remember, a little goes a long way! Coconut oil is another fantastic ingredient, bringing healthy fats that support skin and coat. For a liquid base, use unsalted chicken broth if your dog loves a savory twist, or water for a simpler flavor.
Variations make these cookies perfect for any doggy gathering. Add a tablespoon of pureed pumpkin or sweet potato for fall festivities, adding a hint of natural sweetness and fiber. Want to make them extra special for a birthday? Sprinkle in some finely chopped parsley for a breath-freshening touch. If you’re feeling adventurous, try shaping the dough into bones or paw prints before baking—because every pup deserves a treat that looks as good as it tastes!
Remember to store these in an airtight container, as they tend to disappear quickly, especially when Max is around!
FAQs About Cheesy Nutritional Yeast Cookies for dogs
Absolutely! Nutritional yeast is not only safe for dogs, but it’s also a healthy addition. It provides a natural cheesy flavor without any dairy, making it perfect for pups with lactose intolerance. Rich in B-vitamins, it can support coat health and improve digestion when used in moderation. As with any new treat, introduce it slowly to ensure your dog doesn’t have any sensitivities.
Yes, they can! Nutritional yeast is completely dairy-free, offering a cheesy taste without the lactose that can upset some dogs’ stomachs. It’s an excellent alternative for those pups who love cheese but can’t handle the real thing. This means your dog can enjoy all the flavor without any of the tummy trouble.
A good rule of thumb is to use 2 to 3 tablespoons of nutritional yeast per batch. This amount provides plenty of flavor and nutritional benefits without overdoing it. Using too much can lead to mild stomach upset, so it’s best to keep it balanced. Start with a couple of tablespoons and adjust based on your dog’s taste preferences.
How long do Cheesy Nutritional Yeast Cookies for dogs last?
These cookies can stay fresh for up to 7 days at room temperature when stored in an airtight container. If you refrigerate them, they’ll last for about 2 to 3 weeks. For longer storage, you can freeze them for up to 3 months. Just ensure they’re in a dry container to keep them crunchy and delicious.
Conclusion
Baking these Cheesy Nutritional Yeast Cookies for dogs is more than just whipping up a tasty snack; it’s about creating heartwarming moments with your furry friend. Picture your pup’s tail wagging wildly as the irresistible aroma fills your kitchen. Sharing these treats is a simple way to express love and care, turning ordinary afternoons into cherished memories.
Whether you’re crafting these cookies alone or getting the whole family involved, the joy of making homemade dog treats is truly satisfying. You’ll find yourself smiling at your dog’s anticipation and delight, knowing you’ve made something special just for them.
I encourage you to give this recipe a try. It’s easy, fun, and your dog will adore you even more for it! For more delicious recipes like this, follow us on social media. Our community is filled with dog lovers just like you, ready to share the love through food. Happy baking!

Cheesy Nutritional Yeast Cookies for Dogs: A Tail-Wagging Treat
Ingredients
Method
- 1. Preheat oven to 350°F (175°C) and line a baking sheet with parchment paper.
- 2. In a bowl, mix oat flour, rolled oats, nutritional yeast, turmeric, and baking powder.
- 3. In a small bowl, whisk egg and melted coconut oil.
- 4. Combine wet ingredients with dry ingredients, adding chicken broth.
- 5. Stir until a smooth dough forms. Adjust water or flour as needed.
- 6. Roll out dough and cut into shapes.
- 7. Place on prepared baking sheet and bake for 25 minutes.
- 8. Cool on a wire rack before serving to your pup.