The Memory Behind This Treat
The first time I whipped up these Chicken Broth Dog Biscuits, I was inspired by a cozy winter evening when Max and I were snuggled up watching the snow fall. I remember thinking about how much I loved a warm bowl of chicken soup and wishing I could offer Max something just as comforting. That’s when the idea of using chicken broth in his biscuits struck me. Little did I know, this would turn into one of Max’s favorite treats!
As I started mixing the ingredients, Max sat patiently by my feet, his eyes full of anticipation. The kitchen quickly filled with the warm, savory aroma of chicken broth, and I could see his nose twitching with excitement. It was clear that these biscuits wouldn’t just be another snack—they’d be a special memory for both of us. The first batch didn’t last long; Max loved the crunchy texture and the rich, meaty flavor.
These homemade chicken broth dog biscuits have become a staple in our treat rotation, especially during chilly months. Every time I bake them, I’m reminded of that magical snowy evening. Cooking for our pets truly creates beautiful memories, and I hope these biscuits bring you and your pup as much joy as they have for us. Plus, for more cozy treats, check out my pumpkin and sweet potato dog treats to keep those tails wagging!
How To Make It (Mix & Ingredients)
Creating these delightful Chicken Broth Dog Biscuits is as simple as a walk in the park! First, let’s set the stage by preheating your oven to 350°F. This gives you just enough time to gather your ingredients and prepare your dough. In a large mixing bowl, combine 2 cups of whole wheat flour and 1 cup of rolled oats. If your pup has a sensitive tummy, feel free to swap the whole wheat flour for oat flour for a gluten-free version. These dry ingredients form the base of your biscuit, providing texture and fiber.
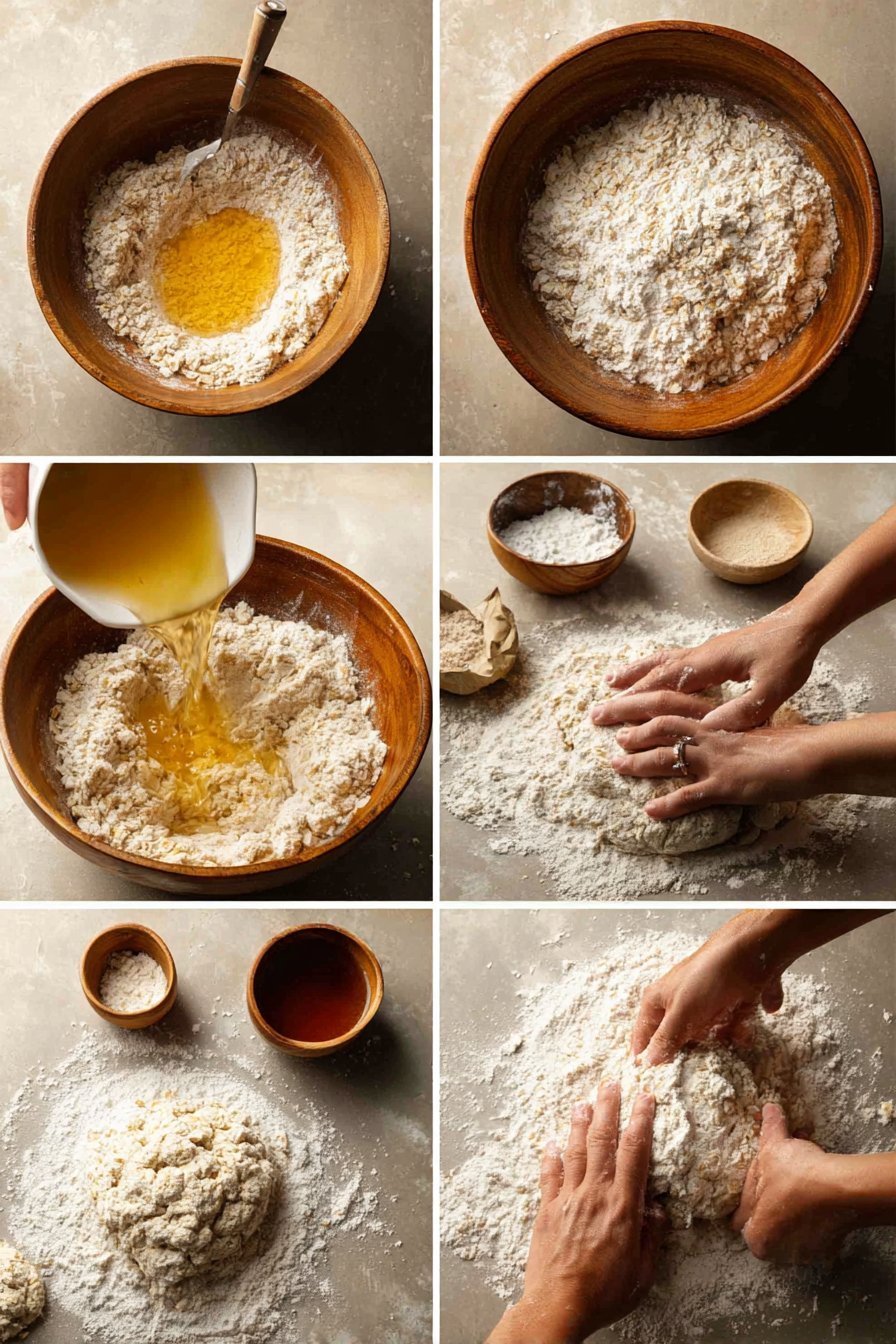
Instructions Process of Chicken Broth Dog Biscuits
Now, it’s time to introduce the wet ingredients. Pour in 1 cup of homemade or low-sodium chicken broth—this is where the magic happens! Crack in one egg, making sure it’s well mixed to bind everything together. If you’re exploring vegan options, you can replace the egg with 1 tablespoon of flaxseed mixed with 2.5 tablespoons of water. Stir until you have a dough that’s easy to handle but not too sticky. Max always gives an approving glance when he sees this step!Once your dough is ready, roll it out to about ¼ inch thick on a floured surface. This is where the fun begins—use your favorite cookie cutters to create shapes that your furry friend will adore. Lay these shapes on a lined baking sheet, giving each biscuit some space to bake evenly. Pop them in the oven for 25-30 minutes, until they’re golden brown and the kitchen is filled with a savory aroma. Let them cool on a wire rack before serving—trust me, it’s worth the wait for those wagging tails!
Make-Ahead & Storage
When you find yourself with a fresh batch of these Chicken Broth Dog Biscuits, you’ll want to keep them as fresh as Max’s excitement on playday. Good news—these treats are perfect for making ahead and storing! Once your biscuits have cooled completely, transfer them into an airtight container. This will keep them crunchy and delicious for up to a week at room temperature. If you’re like me and enjoy preparing in bulk, these biscuits can also be stored in the fridge, extending their shelf life to about 2 weeks.
For those who love to plan ahead or have an especially enthusiastic chewer at home, consider freezing the biscuits. Just place them in a freezer-safe bag, and they’re good to go for up to 3 months. Simply thaw a few at room temperature when you’re ready to treat your pup to something special. Remember, it’s always wise to store them in small batches to maintain the best flavor and texture over time.
An important tip: Always ensure the biscuits are completely cooled before storing, especially if you’re putting them in the freezer. This prevents moisture build-up, which can make them soggy and less appealing to your furry friend. Trust me, nothing beats the satisfying crunch of these Chicken Broth Dog Biscuits, and with proper storage, you’ll have them ready whenever your pup gives you those irresistible puppy eyes!
Best Ingredients & Party Variations
Choosing the right ingredients for your Chicken Broth Dog Biscuits can make all the difference in flavor and nutrition. Start with a good-quality chicken broth. Homemade is ideal because it’s free from additives, but if you’re short on time, opt for a low-sodium store-bought version. This keeps the biscuits healthier for your pup. When it comes to flour, whole wheat flour is a nutritious choice packed with fiber, but if your dog has a gluten sensitivity, oat flour is a fantastic substitute that maintains the treat’s wholesome goodness. Rolled oats add texture and are a gentle grain that dogs typically digest well.
Now, let’s jazz things up for special occasions or a doggie birthday party! Consider incorporating some finely chopped carrots or pumpkin puree for an extra boost of vitamins and a touch of sweetness. These additions not only enhance the nutritional value but also make the biscuits more appealing with a pop of color. If your pup enjoys a bit of added protein, sprinkle in some shredded chicken. Just ensure any add-ins are well-cooked and dog-safe.
For a fun twist when serving at a doggie gathering, use various cookie cutter shapes—bones, paws, or hearts are all favorites. If you’re feeling creative, top the biscuits with a light spread of unsweetened applesauce before serving. Remember, these variations not only cater to your dog’s taste buds but also make treat time special and memorable. Happy baking!

Serving of Chicken Broth Dog Biscuits
Conclusion
Making these Chicken Broth Dog Biscuits is more than just whipping up a tasty treat; it’s about creating joyful moments with your furry friend. Remember when Max sat patiently by the oven, his eyes full of anticipation? Those shared moments of love and connection are truly priceless.
Whether you’re baking for a special occasion or simply as an act of love, these biscuits are sure to make your pup’s tail wag with delight. Plus, the aroma filling your kitchen is a little bonus for you!
I encourage you to gather the ingredients and give this recipe a try. It’s a wonderful way to bond with your dog and bring a little extra happiness into your home. Don’t forget to snap a few pictures of your pup enjoying their treat!
For more delicious recipes like this, follow us on social media! Let’s keep sharing the joy of homemade dog treats together.
Can I use store-bought chicken broth for Chicken Broth Dog Biscuits?
Absolutely, you can use store-bought chicken broth for these biscuits. Just be sure to choose a low-sodium or unsalted variety to keep your pup healthy. Homemade chicken broth is an excellent option too, as it typically has fewer additives. Always check the ingredients to ensure there are no harmful substances like onions or garlic, which are toxic to dogs.
How should I store homemade Chicken Broth Dog Biscuits?
Once the biscuits have cooled completely, store them in an airtight container at room temperature where they’ll stay fresh for up to one week. If you want to keep them longer, refrigerate them for up to two weeks or pop them in the freezer for up to three months. Always ensure the biscuits are fully cooled before storing to prevent moisture buildup.
Are Chicken Broth Dog Biscuits safe for dogs with allergies?
These biscuits are made with simple ingredients, but if your dog has allergies to wheat or eggs, you can easily substitute whole wheat flour with oat flour and replace the egg with a flaxseed and water mix. It’s always a good idea to consult your veterinarian before introducing new foods to dogs with sensitivities. Doing so ensures your furry friend stays safe and healthy.
Recipe

Irresistibly Good Homemade Chicken Broth Dog Biscuits
Ingredients
Method
- Preheat oven to 350°F (175°C).
- In a large bowl, combine whole wheat flour and oats.
- Add chicken broth and egg, mix until dough forms.
- Roll dough to ¼ inch thick on a floured surface.
- Use cookie cutters to cut shapes from the dough.
- Place biscuits on a lined baking sheet.
- Bake for 25-30 minutes until golden brown.
- Let biscuits cool completely on a wire rack.
Notes
- Freeze for up to 3 months for longer storage.